
The Exact Steps for Setting up a Chatbot

Ever wondered how to make your own chatbot? Chances are that you’ve probably encountered one in a customer service interaction without even realizing. But it’s not just big brands that have the capacity and resources to build their own bots.
We’re going to use a ManyChat walkthrough to show you how to leverage your Facebook account to reach more users. Facebook Messenger chatbots allow you to create autoresponder sequences and qualify more leads.
All you need is a Facebook account and page. And when you’re playing around with new concepts and experimenting, we’d recommend creating a new account to test out your chatbot.
Let’s get started.
Your ManyChat Account
There’s lots of software to help you design chatbots, but we think that ManyChat is one of the best tools on the market. It’s free too, so it can really help you to get to grips with chatbot tech.

ManyChat will take you through a few introductory steps and you’ll then be asked to edit your first broadcast message.

Figure 1: https://blog.manychat.com
Greetings, Welcomes and Default Replies
Before you start building your own sequence, a basic fundamental you can cover, is your chatbot greeting. This is what all of your customers will read when they interact with your Facebook Page on Messenger, so it’s like an intro.

Welcome Text is a little bit different and you can get started with this on your chatbot dashboard. Head to Automation and you’ll find the Welcome Message option.
You’ll have default text already for your chatbot which will say “Welcome! Thank you for subscribing. The next post is…” So, you can edit this and get it to say what you like.

Finally, you can create default replies too, which is a really useful function that your chatbot can send when it doesn’t recognise what a customer is asking. You can send messages which will signpost customers to another customer service function i.e a member of staff. This will help to provide customers with quick options.
Head to Automation > Default Reply. You’ll spot some pre-determined text again - “Page Name typically replies in 1 day. If you want to ask something just press the Take to human” button“.
Play around with the text until it says what you’d like it to and hit publish.

But how will your chatbot know how to respond? Well you can let it know which keywords can warrant certain responses.
Go to Automation > Keywords.

When you select a word or type in a new one, you’ll have the option to “Create New Reply” which will allow you to create an automated response to the specific keyword when it’s used as a message.
This is super important because Spam still applies to chatbots and sequences, so this is a good way to allow people to unsubscribe from your content if they want to. You can also include an option in your first message and create unsubscribe buttons too – more on buttons later.
Sorting out your Sequences
Okay, so the star of the show with your chatbot set-up is your sequencing. On your main ManyChat dashboard, you can head to the Automation section and then to Sequences.

ManyChat provide you with a very useful Example Sequence too, so you’ll find this when you click through to start your own sequence. We recommend taking a look through the different parts of a typical sequence so you can familiarize yourself with the format.
This is what you’ll find:

As you can see, it gives you some time-sensitive steps for a standard sequence and pointers on content for each autoresponder.
It’s really worth clicking through to each stage of the sequence, as ManyChat will give insight into what type of messaging works at what time and where. You can also get to grips with the interface.
Hit “New Sequence” to try out your own content and my default, you’ll have the same format as your example sequence.
Click on the first Introduction message or a message of your choice.
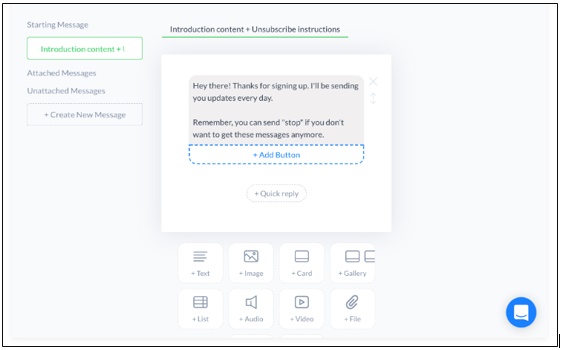
This is where you can edit your text and add any images etc. You can “add buttons” too. Think of your buttons like you would in a multiple choice quiz. Your customers will use buttons to choose their response to your messages.

When you’ve finished your message, don’t forget to make it active in your sequence:

It’s then a case of repeating the same steps for each of the messages you want in your sequence, depending on how many.
You can also see the “Delay” column along the left-hand side of the dashboard. This is where you can alter the time-frame of your sequence and when your messages will send. Just click on a time-frame and edit.
There are lots more advanced options to use with your onboarding sequences, such as segmenting, custom fields, creating forms, creating campaigns etc which you’ll generate with more data, but for a basic sequence, ManyChat is awesome.
Connecting your Chatbot
So, you’ve created your first chatbot and sequence, but you need to make it accessible to customers. There’s a “Growth Tools” function within ManyChat which gives you lots of options which are well-worth exploring.
Head back to your Facebook page.

You’ll see the “Add Button” function, which will trigger a pop-up and allow you to “Use Our Messenger Bot”, then hit “Get Started”, which will then appear on your Facebook page. Your chatbot will then be integrated and connected to your Facebook page *high five*.
Final Thoughts
Chatbots are incredibly useful and convenient for your customers and your brand. They can provide fast, efficient options for a user and free up more time for your employees.
Your lead generation will benefit from a chatbot and the ManyChat interface is great for designing seamless, engaging onboarding sequences that your customers will love.
----
To unlock access to all of this awesomeness, including Master Classes, Networking, tips, tools and an active community of curious learners like you, apply to become a member of the H2H Human Marketing Club. -> https://www.h2hclub.com
Author

Bryan Kramer
"The Zen Master of Marketing" - Forbes.
TEDTalk & Keynote Speaker, 2 x Best-Selling Author of Shareology & Human to Human: H2H, CEO PureMatter & H2H Companies, Forbes Contributor

